3.4 - Multiple Clocks#
In this section, you will add multiple clocks to your clock application, and allow the amount of clocks to be adjusted dynamically, similar to the “World Clocks” feature of the iOS Clocks application.
Editor’s note
It’s unclear what the original author meant by “trace”.
Notifications - prelude#
Now, how do you manage these clocks dynamically? You could keep track of each of them manually, but it will be complicated. You could also not keep track of any of them, but then you can’t control them. Instead, you can use the notifications, which is a pretty handy way to communicate between objects.
Here is a related article: NSNotificationCenter
Updating the interface#
First, you need to adjust the interface according to the amount of clocks. You need to count how many clocks exist so that the user doesn’t accidentally delete the last clock.
Controller.h:
#import <AppKit/AppKit.h>
#import "TimeView.h"

@interface Controller : NSObject
{
    id timeView;
    unsigned int totalNumber;
}

- (void) showCurrentTime: (id) sender;
- (void) addClock: (id) sender;
- (void) deleteClock: (id) sender;
@end
We add an ivar (instance variable), totalNumber, to trace the number of clocks, and add two actions manually since we didn’t generate the class files from Gorm.
Controller.m:
- (id) init {
    self = [super init];
    self->totalNumber = 1;
    return self;
}

- (void) addClock: (id) sender {
    TimeView* aView;
    NSWindow* mainWindow = [NSApp mainWindow];
    NSRect windowFrame = [mainWindow frame];
    NSRect timeViewFrame = [self->timeView frame];

    [mainWindow setFrame: NSMakeRect(
                    windowFrame.origin.x,
                    windowFrame.origin.y,
                    windowFrame.size.width
                     + timeViewFrame.size.width,
                    windowFrame.size.height
                  )
                 display: YES];
    aView = [[self->timeView alloc]
              initWithFrame: NSMakeRect(
                  timeViewFrame.origin.x
                   + self->totalNumber * timeViewFrame.size.width,
                  timeViewFrame.origin.y,
                  timeViewFrame.size.width,
                  timeViewFrame.size.height
              )
            ];

    [[mainWindow contentView] addSubview: aView];
    [aView release];
    self->totalNumber ++;
}

- (void) deleteClock: (id) sender
{
    NSArray* subviews;
    NSWindow* mainWindow = [NSApp mainWindow];
    int i;
    NSRect windowFrame = [mainWindow frame];
    NSRect timeViewFrame = [self->timeView frame];

    subviews = [[mainWindow contentView] subviews];

    // This part was originally formatted unreadably, so it's possible that the boundaries of the `if` statement are incorrect.

    for (i = [subviews count]-1; i > 1; i--) {
        if (
            [[subviews objectAtIndex: i]
              isMemberOfClass: [self->timeView class]]
        ) {
            [[subviews objectAtIndex: i] removeFromSuperview];
        }
        self->totalNumber --;
        [mainWindow setFrame: NSMakeRect(
                                  windowFrame.origin.x,
                                  windowFrame.origin.y,
                                  windowFrame.size.width
                                   - timeViewFrame.size.width,
                                  windowFrame.size.height)
                     display: YES];
        break;
    }
}
In the method -init, we initialize totalNumber to 1 since
there is already one clock in the Gorm file. In the method -addClock:, we
calculate the necessary change in the window size and where to put the new clock. They
are done by very simple calculation. Once we add the new clock into the
window, the window will retain this clock. Therefore, we can release it
and no longer trace it. In the method -deleteClock:, we also need to
change the size of window by simple calculation. The only problem is
that since we don’t trace the clocks, how do we delete them? We can get
all the subviews from the window, and delete the last TimeView
object. This way is very easy to maintain.
Notifications#
Now, if you hit the button , you will notice that only the original clock is updated. That’s because it is the only one which is connected to the outlet. We could get all the subviews from the window, and call their method one by one. That would work, but it’s not elegant. I can use the “Notification” and “Notification Center” to archive this goal. Read the Cocoa document for more details.
The idea is that an object can be a speaker, and many objects can be the audience. Each member of the audience is called an “observer”.
So when the user press the button , the “Controller” must speak to all the clocks. Below is how it speaks:
Controller.h:
- (void) showCurrentTime: (id)sender
{
    [[NSNotificationCenter defaultCenter]
      postNotificationName: @"TimeViewShouldUpdateCurrentTime"
                    object: [NSCalendarDate date]];
}
Actually, it talks to the “Notification Center”, and the notification
center will broadcast what it says. I need to specify the name of the
notification because there are so many notifications passing through the center. The
name of the notification distinguishes the notification. And a notification
can contain an object within it, which stores the information that the speaker is sending to the audience. It can be nil. Here, I use +[NSCalendarDate date].
Now, the speaker speaks. How does the audience listen? In this example,
all the instances of TimeView should listen in order to themselves with the current time. For an object to listen, they need to register as an “observer” with the Notification Center.
TimeView.m:
- (id) initWithFrame: (NSRect) frame
{
    self = [super initWithFrame: frame];

    self->box = [[NSBox alloc]
                  initWithFrame: NSMakeRect(
                    0, 0, // x=0, y=0
                    frame.size.width,
                    frame.size.height
                  )
                ];
    [self->box setBorderType: NSGrooveBorder];
    [self->box setTitlePosition: NSAtTop];
    [self->box setTitle: @"Local Time"];

    self->clockView = [[ClockView alloc]
                  initWithFrame: NSMakeRect(
                    0, 70, // x=0, y=70
                    frame.size.width,
                    frame.size.height
                  )
                ];
    self->labelDate = [[NSTextField alloc]
                  initWithFrame: NSMakeRect(10, 45, 35, 20)];
                                 // x=10, y=45, width=35, height=20
    [self->labelDate setStringValue: @"Date: "];
    [self->labelDate setBezeled: NO];
    [self->labelDate setBackgroundColor: [NSColor windowBackgroundColor]];
    [self->labelDate setEditable: NO];

    self->labelTime = [[NSTextField alloc]
                  initWithFrame: NSMakeRect(10, 15, 35, 20)];
                                 // x=10, y=15, width=35, height=20
    [self->labelTime setStringValue: @"Time: "];
    [self->labelTime setBezeled: NO];
    [self->labelTime setBackgroundColor: [NSColor windowBackgroundColor]];
    [self->labelTime setEditable: NO];

    self->localDate = [[NSTextField alloc]
                  initWithFrame: NSMakeRect(55, 45, 130, 20)];
    self->localTime = [[NSTextField alloc]
                  initWithFrame: NSMakeRect(55, 15, 130, 20)];

    [self->box addSubview: self->clockView];
    [self->box addSubview: self->labelDate];
    [self->box addSubview: self->labelTime];
    [self->box addSubview: self->localDate];
    [self->box addSubview: self->localTime];
    [self->clockView release];
    [self->labelDate release];
    [self->labelTime release];
    [self->localDate release];
    [self->localTime release];

    [self addSubview: self->box];
    [self->box release];

    [[NSNotificationCenter defaultCenter]
      addObserver: self
         selector: @selector(setDate:)
             name: @"TimeViewShouldUpdateCurrentTime"
           object: nil];
    [self showCurrentTime: self];
    return self;
}
Only one line is needed to register an observer. It specify what object to receive
the notification (addObserver:), which method to handle the notification
(selector:), the name of the notification being observed (name:), and the
object of the notification (object:). It is important that the name of
notification should be the same as what the speaker uses. So once the
speaker sends TimeViewShouldUpdateCurrentTime, the observers of TimeViewShouldUpdateCurrentTime will receive the
notification, and the setDate: message will be sent to the observer. The object: nil means
that this object accept all notifications with the name
TimeViewShouldUpdateCurrentTime no matter what kind of object it
carries.
Now, we register the TimeView for the notification
TimeViewShouldUpdateCurrentTime. Once the speaker speaks, the method
-setDate: will be called. So we need to implement this method.
TimeView.m:
- (void) setDate: (NSNotification *) notification
{
   self->date = [notification object];
   [self->date setTimeZone: [NSTimeZone timeZoneWithName: [box title]]];
   [self->date setCalendarFormat: @"%a, %b %e, %Y"];
   [self->localDate setStringValue: [self->date description]];
   [self->date setCalendarFormat: @"%H : %M : %S"];
   [self->localTime setStringValue: [self->date description]];
   [self->clockView setDate: self->date];
}
We reuse the -setDate: from Section 3.2, but change the interface
because right now, it is called by the Notification Center. And I can get
the object the notification carries by using [NSNotification object] method.
Finally, I need to remove the observer from the Notification Center when it
is destroyed. Otherwise, it causes problems. So here is the -dealloc method.
TimeView.m:
- (void) dealloc
{
   [[NSNotificationCenter defaultCenter] removeObserver: self];
   [self->date release];
   [super dealloc];
}
To sum up, the speaker speaks to the Notification Center with a specific notification name, and may or may not put an object on the notification. The audience register themselves to the Notification Center with what kinds of notification they want to receive by the name of notification. When the Notification Center recieves the notification, it will call the registered method on each of the observers.
There are some source code needed to be modified due to the change in the
setDate: method. They are not shown here, and it’s not hard to figure
them out.
Timers#
Since I can update all the clocks manually, I can do it automatically.
NSTimer is a timer which can trigger an action after a given time
repeatly or not. Here, I’ll use a NSTimer to make the clock “run”.
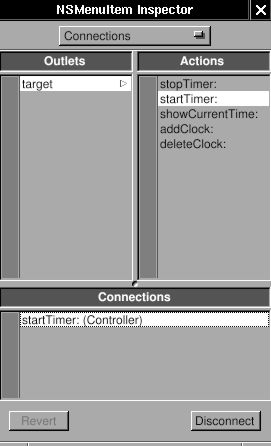
I need to add a new submenu “Timer”, and two menu items: “Start” and
“Stop”. Add two action in class Controller: “startTimer:” and
“stopTimer:”. Then connect the menu item to the action. This should be
very easy by now.
Figure 4-31. Connect menu action


Add these two actions and a NSTimer in Controller.
Controller.h:
#import <AppKit/AppKit.h>
#import "TimeView.h"

@interface Controller : NSObject
{
    id timeView;
    unsigned int totalNumber;
    NSTimer *timer;
}
- (void) showCurrentTime: (id) sender;
- (void) addClock: (id) sender;
- (void) deleteClock: (id) sender;
- (void) startTimer: (id) sender;
- (void) stopTimer: (id) sender;
@end
Controller.m:
- (void) startTimer: (id) sender
{
    self->timer = [
        NSTimer scheduledTimerWithTimeInterval: 1
                                        target: self
                                      selector: @selector(showCurrentTime:)
                                      userInfo: nil
                                       repeats: YES];
}

- (void) stopTimer: (id) sender
{
    [self->timer invalidate];
}
That’s all. In NSTimer, we set the interval, target, selector (method to call), and whether it repeats. Then it will trigger the action -showCurrentTime: every second.
Use -invalidate to stop the timer. Generally, you need to write a thread
in order not to block the user interface. But with the help of NSTimer,
you can totally avoid this problem. Finger (in gnustep/usr-apps/ (might be a broken link)) is
another good example how to avoid thread using non-blocking I/O.
Caution
Since self->timer is autoreleased, it might disappear anytime in this example, which causes a serious memory problem, and usually makes the application unstable. It would be better to retain the timer in -startTimer: and release it in -stopTimer:, and to ensure that only one timer exists when the user click the “start” menu more than once.
Congratulations! You have learned many new things over the course of this tutorial.